
Rapid Prototyping & Rapid Manufacturing Expert
Specialize in CNC machining, 3D printing, urethane casting, rapid tooling, injection molding, metal casting, sheet metal and extrusion
Follow me on: 
Everything you should know about vacuum casting
vacuum castinging is one of the important processes for manufacturing prototypes. It has the advantages of low cost and stable product quality. It is very suitable for rapid engineering testing (quick testing of projects), design concept verification, and physical display (product physical structure display) Wait. Before developing from a concept or idea to mature mass production, designers need to continuously discover problems and improve product planning; many industrial plastic parts, such as auto parts, robots, medical devices, and 3C products, usually use injection molding process Millions of units are produced, but the cost of mold opening is very high, and the time to develop the mold is relatively long (and the design and production cycle of the mold is long). What makes it more difficult for designers is that if there is a small flaw in the plan, It will cause huge waste (the cost of modifying the mold is quite high). You must know that a set of steel molds usually costs 10,000 or even tens of thousands of dollars, and the cost of time cannot be compensated. Therefore, it is an essential step to produce small batches of plastic parts to verify the design, such as 20-500 pieces. At this time, vacuum castinging is the preferred processing method.
What is vacuum casting?
vacuum casting, also known as silicone mold, uses the manufactured silicone mold to replicate plastic parts. The poured polyurethane material is defoamed, stirred, preheated and casted under vacuum conditions, and the secondary curing molding process is carried out in a thermostat at 60°C-80°C for 2-3 hours. The replica made of silicone composite mold can reach the strength and hardness of ABS and other materials, and can also be equipped with colors according to requirements. The vacuum castinging process can manufacture small batches of plastic parts with complex structures, uniform wall thickness, and certain functions and appearances.
The manufacturing process of vacuum casting
The manufacturing process of the vacuum casting is divided into three steps: making the main mold prototype, making the mold and pouring the parts.
Step 1: Prototype the master mold
You can choose any material with stable characteristics to make the main mold prototype. It is usually made of plastic or metal materials. The only requirement is that this material needs to be stable for a certain period of time at a high temperature of 40°C.
It is worth noting that the prototype plays a decisive role in the quality of the copied parts. If you want to process high-precision, high-gloss or even high-transparency plastic parts, then the master mold prototype is best processed by CNC machining.
It is also an ideal choice to manufacture the master model prototype by SLA process, but compared with the master model prototype processed by CNC, the cost of the final part may be quite different (the accuracy will be slightly worse, and the unit price will be slightly lower); this is when When you choose the vacuum castinging process to manufacture parts, the quotations of different manufacturers will be quite different, even several times different (one of the reasons why the quotations of different manufacturers are different).
The surface of the main model prototype can also be designed with spray texture or matte effect. The silicone mold will accurately reproduce the details and textures, and the surface of the final replica will maintain a high degree of consistency with the prototype.
Step 2: Make the Silicone Mold
The pouring mold is made of liquid silicone, also known as RTV mold. Silicone is chemically stable, self-releasing and flexible, minimizing shrinkage and efficiently replicating part details from prototype to mold. Stir the silica gel and curing agent evenly. The appearance of the mold silica gel is a flowing liquid, component A is silica gel, and component B is curing agent. Example: Take 100 grams of silica gel and add 2 grams of curing agent (Note: The silica gel and curing agent must be stirred evenly. If they are not stirred evenly, one part of the mold will be cured and one part will not be cured, and the silicone will be cured unevenly. It will affect the service life of the silicone mold and the number of mold turning times, and even cause the mold to be scrapped.
Apply tape to flat places around the prototype to form a parting surface after subsequent cutting of the mold. The prototype is then suspended in a casting box, and glue sticks are placed on the parts to provide sprues and vent holes for venting during the silicone molding process. Pour the silica gel into the box, and then evacuate the air bubbles. The time should not be too long. Under normal circumstances, it should not exceed ten minutes to prevent brushing or pouring from being impossible after cross-linking reactions occur.
Put the casting box in the oven to cure, the temperature is 40℃, the time is 8-16 hours, this time depends on the volume of the mold.
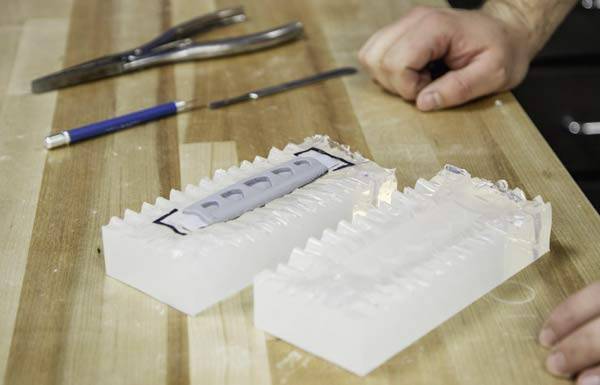
After the silicone rubber is cured, remove the box and the glue stick, cut along the parting line, and take out the prototype. At this time, the silicone rubber forms a cavity, which is exactly the same shape as the prototype; in this way, the silicone mold can be made success.
Step 3: Vacuum casting
Put the mold into the oven to solidify and preheat to 60-70℃.
Select a suitable release agent and use it correctly before closing the mold, which is very important to avoid sticking and surface defects.
Prepare the polyurethane resin according to your design requirements, mix the two-component resin in the correct ratio, then fully stir and degas under vacuum for 50-60 seconds, and preheat it to about 40°C before use.
Pour polyurethane resin into the cavity of the mold. After the cavity is filled, put the mold into a vacuum environment to remove the air in the cavity, and fill every position of the mold with liquid silicone to ensure The shape of the molded product is exactly the same as the prototype.
Continue to put the mold in the oven to cure again. Average curing time: 1-3 hours for small pieces, 3-6 hours for large pieces.
After curing, take the casted part out of the silicone mold, and you can get a replica of the original part.
Repeat this cycle.
Material Selection for vacuum casting
Polyurethane resins are polymers with a wide range of properties and uses. Manufacturers of vacuum casts source polyurethane resins, including Hei-Cast from Japan and Axson from France. The material properties are similar to engineering plastics, such as ABS, PMMA, PC, PP, PA, etc. The types of casting resins can range from transparent, translucent to colored, soft rubber or hard plastic, and even impact-resistant, high-temperature resistant (120°C) or fire-resistant (UL94-V0) materials. vacuum castinging process can be used for secondary injection molding and inserts can also be added;
Technical parameters of vacuum casting
Description | Tolerance Note |
Accuracy | Due to the thermal expansion of the liquid and the natural properties of the flexible mold, the expected shrinkage rate is +0.15%; the standard tolerance is ±0.15mm/100mm, and the highest accuracy can reach ±0.05mm. |
Maximum size | Vacuum pouring equipment can accommodate a maximum size of 2d.0M*1.2M*1.0M. |
Part Minimum Wall Thickness | To ensure adequate mold filling, a wall thickness of at least 0.75mm is necessary. For best results we recommend a wall thickness of at least 1.5mm. |
Typical number of replicas | Up to 25 replicas per mold (depending on mold complexity and casting material); only 12 or even 10 replicas can be made for a mold if the part requires high quality (e.g. transparent or complex structures) . |
Typical lead times | Up to 50 cast samples can be produced within 10 to 15 days, depending on part size and volume |
Finishing Options for Vacuum Overmolding
Matte/frosted.The master prototype is sandblasted matte, the replica part has a smooth satin finish, and transparent and translucent parts with this finish will appear matte. A matte finish is useful for handheld and high-touch areas, as it reduces the visibility of fingerprints.
Semi-gloss. A finish that has some gloss but is not very reflective. The semi-gloss finish is between high-gloss and matte, with a smooth, easy-to-clean surface.
High gloss. Create a highly reflective finish by polishing the master prototype before making the mold. Has the highest transparency for transparent parts. Specular can be used for cosmetic models, lenses and more.
Polyurethane can be mixed with pigments to achieve a variety of colors. Black, natural, clear and various custom colors (Raoul or Pantone colors closest to your choice).
Advantages of vacuum casting
Fast turnaround. Up to 50 parts can be delivered in 7-15 days or less depending on part specification (size, construction) and quantity. Compared with injection molding, the production time of vacuum casting is shorter. Traditional injection molds take 4 to 8 weeks to complete production. While the silicone mold only needs 1-2 weeks to be fully completed, and all complex parts can be completed in a short time.
Low cost. Silicone is cheaper in terms of cost compared to injection molds. Injection molding is based on steel or aluminum fabrication. The cost of a silicone mold may be between hundreds and thousands, while the cost of one injection molding is between thousands and tens of thousands.
Capable of producing large parts. Depending on the type of equipment used, vacuum casting can create very large parts such as automotive enclosures, large robotic enclosures, CT medical enclosures, etc.
Surface finish is better than injection molding. The vacuuming process removes air bubbles and allows the material to fully bond with the cavity, capturing details.
vacuum castinging can realize the required complex parts or designs at one time, while CNC processing needs to be split and produced according to size and structure most of the time.
Various colors to choose from. Coloring pigments can be added to the resin for a variety of color options.
Repeatability. The silicone mold can be used about 20 times before needing to be replaced.
Application of vacuum casting
Suitable for small batch production. Vacuum double molding is ideal for small batches—when quantities prove insufficient to invest in injection molds—and for first-run (first run) production parts, which can be completed weeks before production molds are ready.
The vacuum castinging process is relatively cheap, making any necessary design changes easy and economical. In addition, different materials can be used for the same mold, allowing designs to be tested with multiple materials.
Market testing. High-quality finishes make vacuum cast parts ideal for consumer testing, user evaluation, and concept models. Under the same design concept, if you don’t know what color is best for the product, you can make a silicone mold, make 10-15 castings, and paint the color and texture of your design on each casting, so that it can be used in the design department Even internal discussions at management meetings allow changes to be quickly adapted for further testing or market launch.
In August 2021, a bicycle manufacturer in the United States wanted to produce 50 taillight covers with a regular diamond-shaped texture, and the parts were required to be transparent. In view of the budget cost, a vacuum castinging process was recommended, and the post-processing was polished; by a professional The in-between team checks the product, and the customer exceeds expectations after receiving the prototype parts; conclusion: the complex mold parts can accurately replicate the structure, details and texture of the prototype, and provide the same surface finish as the prototype, achieving similar injection molding the result of production.